Post processing is an art of its own. It involves knowledge of colors, contrast enhancement, noise reduction, file formats and much more. It is difficult to master and I am just a novice myself. There are plenty of image processing programs out there to choose from and some of them are even specialized for astrophotography. I use Photoshop since I have already played around with it for some years now and like it. In this post I will describe how I do my most basic image editing.
Remember to always keep the original image and save the edited image as a copy!
Application Overview
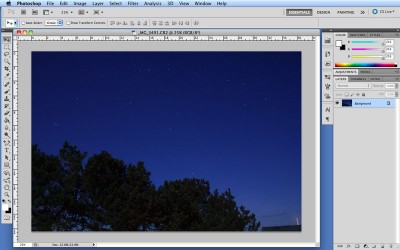
 The Photoshop workspace has a menu bar at the top, a tool box on the left and a series of menu boxes and windows on the right.
Before we begin, you need to know the following: To open a file go to File > Open. To save a file go to File > Save. To undo an action go to Edit > Step Backward. To activate the guiding grid go to View > Show > Grid. To convert a background to a layer (all images are opened as backgrounds), double click on it in the layer menu on the right.
Rotating
Rotating the image is a simple technique that can make horizons horizontal or turn the image upside down. I know of two ways to do this in Photoshop.
 1. Go to Image > Image Rotation in the menu bar. From here you can choose to rotate the image 90° or 180° or you can select Arbitrary… to choose any angle you like.
2. Go to Edit > Free Transform. This frames the image in a box and you can then click and drag its corners to rotate it. Note that the image has to be a layer for this to work. Finish by clicking the check symbol in the free transform menu.
Cropping
![]() To frame the image exactly as you want it, you can use the crop tool. It is located in the tool box on the left. Just select it and draw a box around the part of the image you want to keep. You can always make minor adjustments after you have placed the initial box. Finish by clicking the check symbol in the crop menu.
To frame the image exactly as you want it, you can use the crop tool. It is located in the tool box on the left. Just select it and draw a box around the part of the image you want to keep. You can always make minor adjustments after you have placed the initial box. Finish by clicking the check symbol in the crop menu.
Brightness, Contrast and Color
 Sometimes the image can be improved by tweaking the brightness, contrast and color.
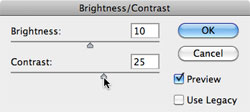
Brightness refers to how much lightning is applied to an image while contrast refers to how much shadowing there is. To adjust them got to Edit > Adjustments > Brightness/Contrast… and drag the pointers until you are satisfied. Most deep-sky objects are fairly low in contrast and increasing it can greatly improve their visibility.
With hue and saturation you can adjust what colors appear in the image and how strong they are. To adjust them go to Edit > Adjustments > Hue/Saturation… and drag the pointers until you are satisfied.
Sharpening
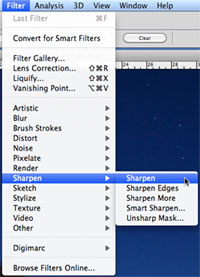
 Most images lose sharpness when they are shot because of the blurring filter in front of the sensor and because of atmospheric seeing effects. Some of the sharpness can be restored by sharpening the image, but you have to be careful: while sharpening makes the stars crisper it also exaggerates the noise. To adjust the sharpening go to Filter > Sharpen > Sharpen. You can do this as many times as you want – in general it is better to apply a little less sharpening than you think you need.
Resizing
 In Photoshop you can resize your image by either changing its physical size or its resolution. My camera produces images with dimensions 3456 x 2304 pixels which is too large for pretty much everything except printing. To resize the image go to Image > Image Size… and choose the new size. Unless you specifically tells it not to, it will conserve the proportions of the image. I prefer a width of 800 pixels for the images I put online.
Saving for the Web
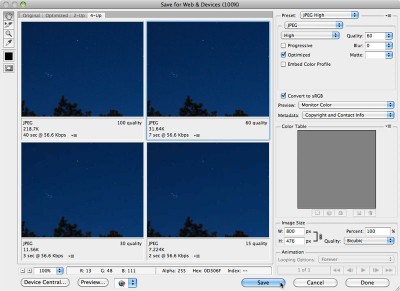
 When you are finally done with the image processing you probably want to show off your images online. There are three common file formats accepted by web browsers: GIF, JPG and PNG. For photographs JPG is the best choice, as it will preserve as much quality as you want while compressing the file size. To save a copy of your image for the web go to File > Save for Web & Devices…. The interface that pops up allows you to choose file format, image size and image quality (and a lot of other stuff that I rarely use). I usually go with the JPG format, a width of 800 pixels and 60% quality.